Upload File to Github to a Repo That Has Not Beeen Cloned
Introduction
GIT is a Version Control System (VCS) (aka Revision Command Organisation (RCS), Source Lawmaking Manager (SCM)). A VCS serves as a Repository (or repo) of program codes, including all the historical revisions. It records changes to files at so-called commits in a log so that yous can recall any file at whatever commit point.
Why VCS?
- The Repository serves equally the backup (in case of lawmaking changes or disk crash).
- Information technology is a living archive of all historical revisions. Information technology lets you revert back to a specific version, if the need arises.
- It facilitates collaboration betwixt team members, and serves equally a project management tool.
- more than...
Git was initially designed and developed past Linus Torvalds, in 2005, to support the development of the Linux kernel.
GIT is a Distributed Version Command System (DVCS). Other popular VCSes include:
- The standalone and legacy Unix's RCS (Revision Control Organisation).
- Centralized Client-Server Version Command System (CVCS): CVS (Concurrent Version System), SVN (Subversion) and Perforce.
- Distributed VCS (DVCS): GIT, Merurial, Bazaar, Darcs.
The female parent site for Git is http://git-scm.com.
Setting Up Git
You need to setup Git on your local auto, every bit follows:
- Download & Install:
- For Windows and Mac, download the installer from http://git-scm.com/downloads and run the downloaded installer.
- For Ubuntu, issue command "
sudo apt-go install git".
- Customize Git:
Issue "git config" command (for Windows, run "Git Bash" from the Git installed directory. For Ubuntu/Mac, launch a "Final"):$ git config --global user.name "your-proper name" $ git config --global user.e-mail "your-email@youremail.com"
The settings are kept in "<GIT_HOME>/etc/gitconfig" (of the GIT installed directory) and "<USER_HOME>/.gitconfig" (of the user's home directory.
You can issue "git config --list" to listing the settings:$ git config --listing user.email=xxxxxx@xxxxxx.com user.proper name=xxxxxx
Git Basics
Git Commands
Git provides a set of simple, distinct, standalone commands developed according to the "Unix toolkit" philosophy - build small-scale, interoperable tools.
To issue a control, showtime a "Terminal" (for Ubuntu/Mac) or "Git Bash" (for Windows):
$ git <command> <arguments>
The commonly-used commands are:
- init, clone, config: for starting a Git-managed project.
- add, mv, rm: for staging file changes.
- commit, rebase, reset, tag:
- status, log, diff, grep, show: evidence status
- checkout, branch, merge, push, fetch, pull
Assist and Manual
The all-time way to get assistance these days is certainly googling.
To go aid on Git commands:
$ git help <command> $ git <command> --help
The GIT transmission is bundled with the software (under the "medico" directory), and likewise available online @ http://git-scm.com/docs.
Getting Started with Local Repo
There are 2 ways to commencement a Git-managed project:
- Starting your own projection;
- Cloning an existing project from a GIT host.
Nosotros shall begin with "Starting your own project" and cover "Cloning" later @ "Clone a Project from a Remote Repo".
Setup the Working Directory for a New Project
Let's start a programming project under the working directory chosen "hello-git", with one source file "Hello.java" (or "Howdy.cpp", or "Hello.c") every bit follows:
public grade How-do-you-do { public static void principal(String[] args) { Organisation.out.println("Hello, earth from GIT!"); } } Compile the "Howdy.java" into "How-do-you-do.grade" (or "Hello.cpp" or "Hello.c" into "Hello.exe").
It is also highly recommended to provide a "README.md" file (a text file in a so-called "Markdown" syntax such equally "GitHub Flavored Markdown") to describe your project:
This is the README file for the Hello-globe project.
Now, we have 3 files in the working tree: "Hello.java", "Hello.form" and "README.md". We exercise not wish to rails the ".course" as they can be reproduced from ".java".
Initialize a new Git Repo (git init)
To manage a project under Git, run "git init" at the project root directory (i.e., "howdy-git") (via "Git Bash" for Windows, or "Terminal" for Ubuntu/Mac):
$ cd /path-to/howdy-git $ git init Initialized empty Git repository in /path-to/hello-git/.git/ $ ls -al drwxr-xr-10 one xxxxx xxxxx 4096 Sep 14 14:58 .git -rw-r--r-- 1 xxxxx xxxxx 426 Sep 14 fourteen:xl Hello.grade -rw-r--r-- one xxxxx xxxxx 142 Sep 14 fourteen:32 Hello.coffee -rw-r--r-- ane xxxxx xxxxx 66 Sep fourteen 14:33 README.md A subconscious sub-directory called ".git" will be created under your projection root directory (as shown in the above "ls -a" listing), which contains ALL Git related data.
Accept note that EACH Git repo is associated with a project directory (and its sub-directories). The Git repo is completely contain within the project directory. Hence, it is prophylactic to re-create, move or rename the project directory. If your project uses more than 1 directories, you may create 1 Git repo for EACH directory, or employ symlinks to link up the directories, or ... (?!).
Git Storage Model
The local repo subsequently "git init" is empty. Yous need to explicitly deposit files into the repo.
Earlier we go on, it is important to stress that Git manages changes to files between so-chosen commits. In other words, information technology is a version control organisation that allows you lot to keep track of the file changes at the commits.
Staging File Changes for Tracking (git add <file>...)
Issue a "git status" command to show the status of the files:
$ git condition On branch principal Initial commit Untracked files: (use "git add <file>..." to include in what will be committed) Hello.class Hullo.java README.physician null added to commit but untracked files nowadays (use "git add" to track)
By default, nosotros kickoff on a branch chosen "chief". We will discuss "branch" later.
In Git, the files in the working tree are either untracked or tracked. Currently, all 3 files are untracked. To stage a new file for tracking, apply "git add <file>..." command.
$ git add README.md $ git status On branch master Initial commit Changes to be committed: (use "git rm --cached <file>..." to unstage) new file: README.doc Untracked files: (use "git add <file>..." to include in what will be committed) Hi.form Hi.java $ git add together *.java $ git status On branch master Initial commit Changes to be committed: (utilize "git rm --buried <file>..." to unstage) new file: Hello.java new file: README.md Untracked files: (use "git add <file>..." to include in what will exist committed) Hello.grade
The control "git add <file>..." takes one or more filenames or pathnames with maybe wildcards pattern. You tin also utilize "git add together ." to add all the files in the electric current directory (and all sub-directories). Only this will include "Hello.course", which nosotros do not wish to be tracked.
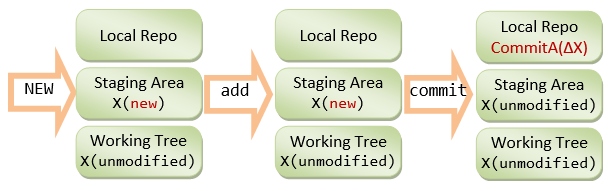
When a new file is added, it is staged (or indexed, or cached) in the staging area (every bit shown in the GIT storage model), merely NOT still committed.
Git uses two stages to commit file changes:
- "
git add together <file>" to stage file changes into the staging surface area, and -
"git commit" to commit ALL the file changes in the staging area to the local repo.
The staging area allows you to grouping related file changes and commit them together.
Committing File Changes (git commit)
The "git commit" command commits ALL the file changes in the staging area. Use a -k option to provide a message for the commit.
$ git commit -m "First commit" [main (root-commit) 858f3e7] commencement commit 2 files changed, viii insertions(+) create mode 100644 How-do-you-do.java create mode 100644 README.medico $ git status On branch master Untracked files: (use "git add together <file>..." to include in what will be committed) How-do-you-do.grade nothing added to commit but untracked files nowadays (apply "git add" to rail)
Viewing the Commit Data (git log)
Git records several pieces of metadata for every commit, which includes a log bulletin, timestamp, the author's username and electronic mail (set during customization).
You can use "git log" to list the commit data; or "git log --stat" to view the file statistics:
$ git log commit 858f3e71b95271ea320d45b69f44dc55cf1ff794 Author: username <email> Date: Thu November 29 13:31:32 2012 +0800 First commit $ git log --stat commit 858f3e71b95271ea320d45b69f44dc55cf1ff794 Author: username <email> Date: Thu November 29 13:31:32 2012 +0800 First commit Hello.java | 6 ++++++ README.medico | 2 ++ ii files inverse, 8 insertions(+)
Each commit is identified by a twoscore-hex-digit SHA-1 hash lawmaking. But we typcially employ the first 7 hex digits to reference a commit, every bit highlighted.
To view the commit details, use "git log -p", which lists all the patches (or changes).
$ git log -p commit 858f3e71b95271ea320d45b69f44dc55cf1ff794 Author: username <email> Date: Thu Nov 29 xiii:31:32 2012 +0800 Offset commit diff --git a/Hello.java b/Hello.java new file mode 100644 index 0000000..dc8d4cf --- /dev/cipher +++ b/Howdy.coffee @@ -0,0 +1,half-dozen @@ +// Hello.coffee +public class Hello { + public static void main(Cord[] args) { + System.out.println("Hello, world from GIT!"); + } +} diff --git a/README.md b/README.md new file mode 100644 index 0000000..9565113 --- /dev/null +++ b/README.md @@ -0,0 +1,2 @@ +// README.md +This is the README file for the Hullo-world projection.
Below are more than options of using "git log":
$ git log --oneline $ git log --author="<writer-name-blueprint>" $ git log <file-blueprint> $ git log --author="Tan Ah Teck" -p Hello.java
File Status (git status)
A file could be untracked or tracked.
As mentioned, Git tracks file changes at commits. In Git, changes for a tracked file could be:
- unstaged (in Working Tree) - called unstaged changes,
- staged (in Staging Area or Index or Enshroud) - called staged changes, or
- committed (in local repo object database).
The files in "working tree" or "staging area" could have status of unmodified, added, modified, deleted, renamed, copied, every bit reported by "git status".
The "git status" output is divided into 3 sections: "Changes non staged for commit" for the unstaged changes in "working tree", "Changes to be committed" for the staged changes in the "staging expanse", and "Untracked files". In each department, Information technology lists all the files that have been changed, i,e., files having condition other than unmodified.
When a new file is created in the working tree, it is marked equally new in working tree and shown equally an untracked file. When the file change is staged, information technology is marked as new (added) in the staging expanse, and unmodified in working tree. When the file change is committed, it is marked as unmodified in both the working tree and staging area.
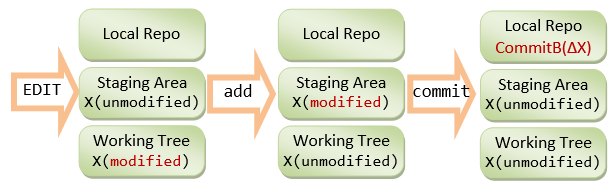
When a committed file is modified, it is marked equally modified in the working tree and unmodified in the staging area. When the file alter is staged, it is marked equally modified in the staging area and unmodified in the working tree. When the file change is committed, it is marked as unmodified in both the working tree and staging area.
For example, made some changes to the file "Hello.coffee", and check the condition again:
public class Hello { public static void main(String[] args) { System.out.println("Howdy, world from GIT!"); System.out.println("Changes after First commit!"); } } $ git status On branch primary Changes non staged for commit: (apply "git add <file>..." to update what volition be committed) (use "git checkout -- <file>..." to discard changes in working directory) modified: Hello.coffee Untracked files: (use "git add <file>..." to include in what volition be committed) Hello.form no changes added to commit (use "git add together" and/or "git commit -a")
The "Hello.java" is marked as modified in the working tree (under "Changes non staged for commit"), but unmodified in the staging surface area (not shown in "Changes to be committed").
You lot can inspect all the unstaged changes using "git diff" command (or "git diff <file>" for the specified file). Information technology shows the file changes in the working tree since the last commit:
$ git diff diff --git a/Hello.coffee b/Hello.coffee index dc8d4cf..f4a4393 100644 --- a/Hello.coffee +++ b/Hello.java @@ -2,5 +2,half dozen @@ public class Howdy { public static void main(String[] args) { System.out.println("Howdy, earth from GIT!"); + System.out.println("Changes subsequently First commit!"); } } The older version (as of last commit) is marked as --- and new one as +++. Each chunk of changes is delimited by "@@ -<former-line-number>,<number-of-lines> +<new-line-number>,<number-of-lines> @@". Added lines are marked as + and deleted as -. In the above output, older version (equally of last commit) from line ii for 5 lines and the modified version from line ii for half dozen lines are compared. One line (marked as +) is added.
Stage the changes of "How-do-you-do.java" by issuing the "git add <file>...":
$ git add together Hullo.java $ git condition On branch principal Changes to exist committed: (utilize "git reset Caput <file>..." to unstage) modified: Hello.java Untracked files: (use "git add <file>..." to include in what will be committed) Howdy.class
Now, it is marked as modified in the staging area ("Changes to be committed"), just unmodified in the working tree (not shown in "Changes not staged for commit").
Now, the changes have been staged. Issuing an "git unequal" to show the unstaged changes results in empty output.
You tin can audit the staged modify (in the staging surface area) via "git diff --staged" control:
$ git diff $ git diff --staged diff --git a/Hi.java b/How-do-you-do.java index dc8d4cf..f4a4393 100644 --- a/Hello.java +++ b/Hello.java @@ -ii,5 +2,6 @@ public class Hello { public static void primary(String[] args) { System.out.println("Hello, globe from GIT!"); + System.out.println("Changes subsequently First commit!"); } } Commit ALL staged file changes via "git commit":
$ git commit -chiliad "Second commit" [master 96efc96] Second commit 1 file changed, 1 insertion(+) $ git status On branch master Untracked files: (use "git add <file>..." to include in what volition be committed) Hello.form nothing added to commit merely untracked files nowadays (use "git add together" to track)
Once the file changes are committed, it is marked as unmodified in the staging area (not shown in "Changes to be committed").
Both "git diff" and "git diff --staged" return empty output, signalling there is no "unstaged" and "staged" changes.
The phase changes are cleared when the changes are committed; while the unstaged changes are cleared when the changes are staged.
Upshot "git log" to list all the commits:
$ git log commit 96efc96f0856846bc495aca2e4ea9f06b38317d1 Author: username <e-mail> Appointment: Thu Nov 29 fourteen:09:46 2012 +0800 Second commit commit 858f3e71b95271ea320d45b69f44dc55cf1ff794 Writer: username <e-mail> Date: Thu Nov 29 thirteen:31:32 2012 +0800 First commit
Bank check the patches for the latest commit via "git log -p -1", with option -northward to limit to the last north commit:
$ git log -p -one commit 96efc96f0856846bc495aca2e4ea9f06b38317d1 Writer: username <electronic mail> Appointment: Thu Nov 29 14:09:46 2012 +0800 2nd commit diff --git a/Hello.java b/Howdy.java alphabetize dc8d4cf..ede8979 100644 --- a/Hello.java +++ b/Hello.coffee @@ -2,v +ii,6 @@ public form Howdy { public static void chief(Cord[] args) { System.out.println("Hullo, earth from GIT!"); + Organisation.out.println("Changes afterward First commit!"); } }
I shall stress once again Git tracks the "file changes" at each commit over the previous commit.
The .gitignore File
All the files in the Git directory are either tracked or untracked. To ignore files (such as .class, .o, .exe which could be reproduced from source) from being tracked and remove them from the untracked file list, create a ".gitignore" file in your project directory, which list the files to be ignored, every bit follows:
*.class *.exe *.[oa] temp/
There should Non be any abaft comments for filename. You can utilize regexe for matching the filename/pathname patterns, e.1000. [oa] denotes either o or a. You can override the rules past using the inverted pattern (!), eastward.g., Adding !hello.exe includes the how-do-you-do.exe although *.exe are excluded.
Now, event a "git status" command to bank check the untracked files.
$ git status On co-operative master Untracked files: (apply "git add <file>..." to include in what volition be committed) .gitignore nix added to commit but untracked files present (use "git add together" to track)
Now, "Hullo.class" is non shown in "Untracked files".
Typically, we besides track and commit the .gitignore file.
$ git add .gitignore $ git status On branch master Changes to be committed: (use "git reset HEAD <file>..." to unstage) new file: .gitignore $ git commit -g "Added .gitignore" [master 711ef4f] Added .gitignore 1 file changed, fourteen insertions(+) create mode 100644 .gitignore $ git condition On branch master nothing to commit, working directory clean
Setting upwards Remote Repo
- Sign upwardly for a GIT host, such as Github https://github.com/signup/gratuitous (Unlimited for public projects; fee for private projects); or BitBucket @ https://bitbucket.org/ (Unlimited users for public projects; 5 free users for private projects; Unlimited for Academic Plan); among others.
- Login to the GIT host. Create a new remote repo called "
test". - On your local repo (allow's go on to work on our "
hello-git" projection), ready up the remote repo'southward proper name and URL via "git remote add together <remote-proper name> <remote-url>" command.
By convention, we shall name our remote repo as "origin". You lot tin find the URL of a remote repo from the Git host. The URL may accept the form of HTTPS or SSH. Utilize HTTPS for simplicity.$ cd /path-to/hello-git $ git remote add origin https://github.com/your-username/test.git $ git remote add origin https://username@bitbucket.org/your-username/test.git
Yous can list all the remote names and their corresponding URLs via "git remote -five", for instance,$ git remote -5 origin https://github.com/your-username/exam.git (fetch) origin https://github.com/your-username/exam.git (push)
At present, you can manage the remote connection, using a simple name instead of the complex URL.
- Button the commits from the local repo to the remote repo via "
git push -u <remote-proper name> <local-co-operative-name>".
Past convention, the main co-operative of our local repo is called "chief" (as seen from the earlier "git condition" output). Nosotros shall talk over "branch" later on.$ git push origin main Username for 'https://github.com': ****** Password for 'https://your-username@github.com': ******* Counting objects: 10, done. Delta compression using up to 8 threads. Compressing objects: 100% (10/x), done. Writing objects: 100% (ten/10), 1.xiii KiB | 0 bytes/s, done. Total 10 (delta ane), reused 0 (delta 0) To https://github.com/your-username/test.git * [new branch] primary -> main Branch master prepare to track remote branch master from origin.
- Login to the GIT host and select the remote repo "test", yous shall find all the committed files.
- On your local organisation, make some alter (e.m., on "
Hello.coffee"); phase and commit the changes on the local repo; and button information technology to the remote. This is known every bit the "Edit/Stage/Commit/Push" cycle.public grade Howdy { public static void main(Cord[] args) { System.out.println("Hello, earth from GIT!"); System.out.println("Changes after Offset commit!"); System.out.println("Changes afterwards Pushing to remote!"); } }$ git status On branch master Your branch is upwards-to-appointment with 'origin/chief'. Changes not staged for commit: (use "git add <file>..." to update what volition be committed) (utilise "git checkout -- <file>..." to discard changes in working dire modified: Hello.coffee no changes added to commit (use "git add" and/or "git commit -a") $ git add *.coffee $ git status On branch master Your co-operative is upwards-to-date with 'origin/primary'. Changes to exist committed: (apply "git reset Caput <file>..." to unstage) modified: Hullo.coffee $ git commit -grand "Third commit" [master 744307e] Third commit 1 file inverse, ane insertion(+) $ git push origin master Username for 'https://github.com': ****** Password for 'https://username@github.com': ****** Counting objects: 5, done. Delta compression using upwardly to 8 threads. Compressing objects: 100% (3/iii), done. Writing objects: 100% (three/3), 377 bytes | 0 bytes/s, done. Full iii (delta one), reused 0 (delta 0) To https://github.com/your-username/exam.git 711ef4f..744307e main -> master
Again, login to the remote to check the committed files.
Cloning a Project from a Remote Repo (git clone <remote-url>)
Equally mentioned earlier, yous tin can commencement a local GIT repo either running "git init" on your own projection, or "git clone <remote-url>" to copy from an existing projection.
Anyone having read access to your remote repo can clone your projection. You tin can likewise clone any projection in any public remote repo.
The "git clone <remote-url>" initializes a local repo and copies all files into the working tree. You can find the URL of a remote repo from the Git host.
$ git clone <remote-url> $ git clone <remote-url> <working-directory-proper noun> $ cd path-to-parent-of-the-working-directory $ git clone https://github.com/your-username/test.git hello-git-cloned Cloning into 'hello-git-cloned'... remote: Counting objects: 13, done. remote: Compressing objects: 100% (11/11), done. remote: Total thirteen (delta two), reused 13 (delta 2) Unpacking objects: 100% (13/13), done. Checking connectivity... done. $ cd hello-git-cloned $ ls -a . .. .git .gitignore Hello.java README.md $ git condition On co-operative master Your branch is upwards-to-date with 'origin/principal'. nothing to commit, working directory clean
The "git clone" automatically creates a remote name called "origin" mapped to the cloned remote-URL. You tin can check via "git remote -v":
$ git remote -five origin https://github.com/your-username/test.git (fetch) origin https://github.com/your-username/test.git (button)
Summary of Basic "Edit/Stage/Commit/Push button" Bike
$ git add together <file> $ git rm <file> $ git mv <former-file-name> <new-file-name> $ git commit -grand "message" $ git push <remote-name> <local-branch-proper name>
OR,
$ git add -A $ git commit -g "message" $ git push
OR,
$ git commit -a -m "message" $ git push
More on Staged and Unstaged Changes
If you modify a file, stage the changes and modify the file again, there volition be staged changes and unstaged changes for that file.
For example, let's continue the "how-do-you-do-git" project. Add one more than line to "README.physician" and stage the changes:
// README.md This is the README file for the Hullo-world project. Brand some changes and staged. $ git condition On branch master Your branch is up-to-date with 'origin/master'. Changes not staged for commit: modified: README.physician $ git add README.dr. $ git status On co-operative principal Your branch is up-to-engagement with 'origin/master'. Changes to be committed: modified: README.md
Before the changes are committed, suppose we modify the file again:
// README.md This is the README file for the Hello-world project. Make some changes and staged. Make more changes before the previous changes are committed. $ git status On branch master Your co-operative is upwards-to-date with 'origin/master'. Changes to be committed: modified: README.md Changes non staged for commit: modified: README.md $ git diff --staged diff --git a/README.doctor b/README.doc index 9565113..b2e9afb 100644 --- a/README.md +++ b/README.md @@ -i,2 +i,3 @@ // README.doctor This is the README file for the Hello-world project. +Make some changes and staged. $ git diff diff --git a/README.md b/README.physician index b2e9afb..ca6622a 100644 --- a/README.doc +++ b/README.doctor @@ -i,iii +1,4 @@ // README.dr. This is the README file for the Hello-world project. Make some changes and staged. +Brand more changes before the previous changes are committed. $ git add README.md $ git status On branch master Your branch is upwards-to-date with 'origin/master'. Changes to exist committed: modified: README.medico $ git unequal --staged diff --git a/README.doctor b/README.md alphabetize 9565113..ca6622a 100644 --- a/README.physician +++ b/README.md @@ -1,two +ane,4 @@ // README.doctor This is the README file for the Hi-world project. +Brand some changes and staged. +Make more changes before the previous changes are committed. $ git commit -m "Unstaged vs. Staged Changes" [master a44199b] Unstaged vs. Staged Changes i file changed, 2 insertions(+), 0 deletion(-)
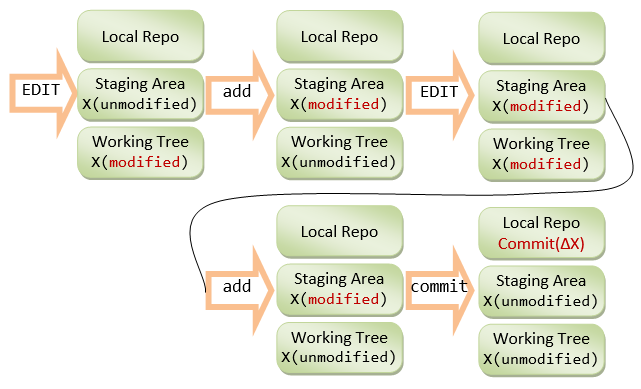
Take note that the stage changes are cleared when the changes are committed; while the unstaged changes are cleared when the changes are staged.
For convenience, you lot tin also employ the "git-gui" tool to view the unstaged and staged changes.
Git GUI Tools
Git-GUI (Windows)
For convenience, Git provides a GUI tool, called git-gui, which tin be used to perform all tasks and view the commit log graphically.
Install "Git-Gui".
To run the git-gui, you can correct-click on the project folder and choose "Git Gui"; or launch the Git-bash beat and run "git gui" command.
To view the log, cull "Repository" ⇒ "Visualize master'southward history", which launches the "gitk". Y'all tin view the details of each commit.
You lot can also view each of the file via "Repository" ⇒ "Scan master's Files" ⇒ Select a file.
Git-gui is arranged with Git. To launch git-gui, correct click on the working directory and cull "git gui", or run "git gui" command on the Git-Bash shell.
[TODO]
EGit Plugin for Eclipse
[TODO]
Tagging
Tag (or characterization) can be used to tag a specific commit as being important, for example, to mark a particular release. The release is often marked in this format: version-number .release-no.modificaton-no (eastward.yard., v1.one.5) or or version-number .release-no.upgrade-no_modificaton-no (east.g., v1.7.0_26).
I recommend that you commit your code and push information technology to the remote repo as often as needed (e.g., daily), to Fill-in your lawmaking. When yous code reaches a stable point (in plough of functionality), create a tag to mark the commit, which can and then be used for CHECKOUT, if you need to show your lawmaking to others.
List Tags (git tag)
To list the existing tags, use "git tag" command.
Types of Tags - Lightweight Tags and Annotated Tags
In that location are ii kinds of tags: lightweight tag and annotated tag. Lightweight tag is simply a pointer to a commit. Annotated tag contains annotations (meta-data) and can be digitally signed and verified.
Creating an Annotated Tag (git tag -a <tag-proper name> -chiliad <message>)
To create an annotated tag at the latest commit, use "git tag -a <tag-name> -m <message>", where -a option specifies annotation tag having meta-information. For instance,
$ git tag -a v1.0.0 -grand "Outset product arrangement" $ git tag v1.0.0 $ git show v1.0.0
To create a tag for an earlier commit, yous need to observe out the commit's name (commencement seven character hash lawmaking) (via "git log"), and event "git tag -a <tag-proper name> -m <message> <commit-proper noun>". For case,
$ git log ...... commit 7e7cb40a9340691e2b16a041f7185cee5f7ba92e ...... Commit three $ git tag -a "v0.ix.0" -m "Last pre-production release" 7e7cb40 $ git tag v0.nine.0 v1.0.0 $ git show v0.9.0 ...... [TODO] Diagram
Creating Lightweight Tags (git tag <tag-name>)
To create a lightweight tag (without meta-data), utilise "git tag <tag-name>" without the -a option. The lightweight tag stores simply the commit hash code.
Signed Tags
Yous tin can signed your tags with your private cardinal, with -s option instead of -a.
To verify a signed tag, use -5 pick and provide the signer's public key.
[TODO] Example
Pushing to Remote Repo
By default, Git does not button tags (and branches) to remote repo. Y'all demand to push them explicitly, via "git push origin <tag-name>" for a particular tag or "git push origin --tags" for all the tags.
Branching/Merging
Git's Data Structures
Git has two primary information structures:
- an immutable, append-only object database (or local repo) that stores all the commits and file contents;
- a mutable staging surface area (or alphabetize, or cache) that caches the staged information.
The staging area serves as the connection between object database and working tree (as shown in the storage model diagram). It serves to avoid volatility, and allows you to stage ALL the file changes before issuing a commit, instead of committing individual file change. Changes to files that have been explicitly added to the index (staging area) via "git add <file>" are called staged changes. Changes that have not been added are called unstaged changes. Staged and unstaged changes can co-exist. Performing a commit copies the statged changes into object database (local repo) and clears the index. The unstaged changes remain in working tree.
The object database contains these objects:
- Each version of a file is represented by a blob (binary big object - a file that can contain whatever data: binaries or characters). A blob holds the file data simply, without any metadata - not even the filename.
- A snapshot of the working tree is represented past a tree object, which links the blobs and sub-trees for sub-directories.
- A commit object points to a tree object, i.e., the snapshot of the working tree at the point the commit was created. It holds metadata such as timestamp, log message, writer's and committer'southward username and electronic mail. It also references its parent commit(south), except the root commit which has no parent. A normal commit has one parent; a merge commit could accept multiple parents. A commit, where new branch is created, has more 1 children. By referencing through the chain of parent commit(southward), you lot tin notice the history of the project.
Each object is identified (or named) past a 160-scrap (or forty hex-digit) SHA-ane hash value of its contents (i.e., a content-addressable name). Whatever tiny alter to the contents produces a different hash value, resulted in a dissimilar object. Typically, we employ the first vii hex-digit prefix to refer to an object, as long every bit there is no ambiguity.
In that location are two means to refer to a detail commit: via a co-operative or a tag.
- A branch is a mobile reference of commit. It moves forrad whenever commit is made on that branch.
- A tag (like a label) marks a particular commit. Tag is often used for marking the releases.
Branching
Branching allows you and your team members to work on different aspects of the software concurrently (on so-chosen feature branches), and merge into the master branch as and when they completes. Branching is the near important feature in a concurrent version command organization.
A branch in Git is a lightweight movable pointer to one of the commits. For the initial commit, Git assigns the default branch name called principal and sets the master branch pointer at the initial commit. As you make further commits on the master branch, the principal branch pointer move forward appropriately. Git as well uses a special arrow called Caput to keep track of the branch that you are currently working on. The Caput always refers to the latest commit on the current branch. Whenever you switch co-operative, the HEAD besides switches to the latest commit on the branch switched.
Instance
For example, let's create a Git-managed project called git_branch_test with only the a single-line README.md file:
This is the README. My email is xxx@somewhere.com
$ git init $ git add README.md $ git commit -chiliad "Commit 1" $ git status $ git add README.md $ git commit -m "Commit 2" $ git condition $ git add together README.md $ git commit -m "Commit 3" $ git log --oneline 44fdf4c Commit 3 51f6827 Commit 2 fbed70e Commit 1
Creating a new Branch (git branch <branch-proper name>)
You can create a new branch via "git branch <branch-name>" command. When you create a new co-operative (says devel, or development), Git creates a new branch pointer for the branch devel, pointing initially at the latest commit on the current branch master.
$ git branch devel
Have note that when you lot create a new co-operative, the Caput pointer is nonetheless pointing at the current branch.
Branch Names Convention
-
masterbranch: the product branch with tags for the various releases. -
development(ornextordevel) branch: developmental branch, to be merged into master if and when completes. - topics branch: a short-live branch for a specific topics, such as introducing a feature (for the
develbranch) or fixing a issues (for themasterco-operative).
Switching to a Branch (git checkout <co-operative-proper noun>)
Git uses a special pointer chosen HEAD to keep track of the branch that you are working on. The "git branch <branch-name>" control simply create a branch, but does not switch to the new co-operative. To switch to a co-operative, use "git checkout <branch-name>" command. The HEAD pointer volition exist pointing at the switched branch (due east.grand., devel).
$ git checkout devel Switched to co-operative 'devel'
Alternatively, you can use "git checkout -b <branch-name>" to create a new branch and switch into the new branch.
If yous switch to a co-operative and brand changes and commit. The Caput arrow moves forwards in that co-operative.
$ git status $ git add README.md $ git commit -yard "Commit 4" [devel c9b88d9] Commit 4 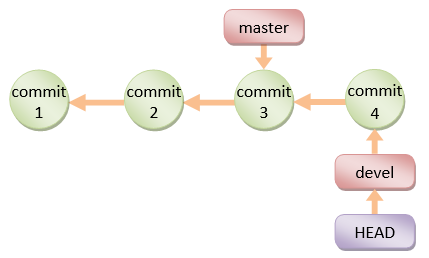
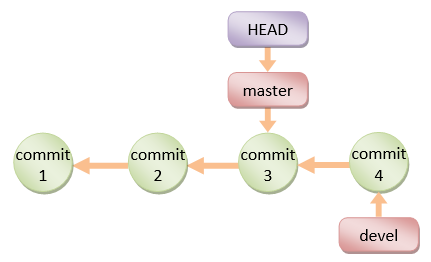
Y'all tin can switch back to the principal branch via "git checkout master". The HEAD pointer moves back to the last commit of the chief branch, and the working directory is rewinded dorsum to the latest commit on the primary co-operative.
$ git checkout main Switched to branch 'master'
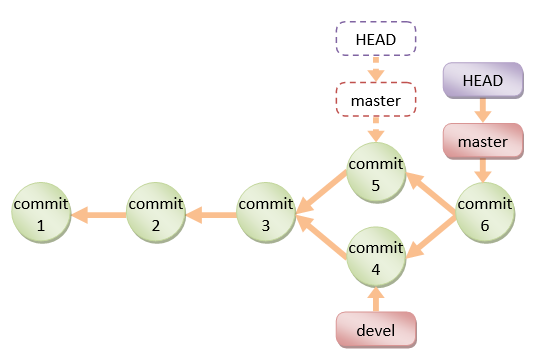
If you continue to work on the main branch and commit, the HEAD pointer moves forward on the primary branch. The two branches at present diverge.
$ git status $ git add README.medico $ git commit -m "Commit 5" [main 6464eb8] Commit 5 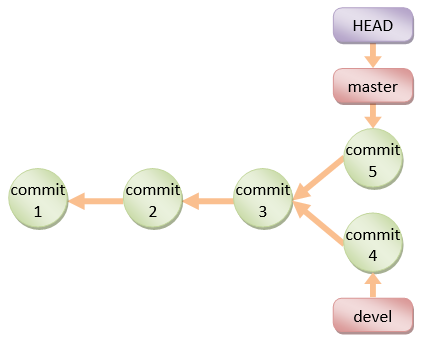
If you cheque out the devel branch, the file contents will be rewinded back to Commit-4.
$ git checkout devel
Merging Ii Branches (git merge <co-operative-proper noun>)
To merge 2 branches, says chief and devel, cheque out the first branch, e,g, primary, (via "git checkout <branch-name>") and merge with another branch, e.chiliad., devel, via command "git merge <branch-name>".
Fast-Frontward Linear Merge
If the branch to be merged is a direct descendant, Git performs fast forwards by moving the HEAD pointer forward. For example, suppose that y'all are currently working on the devel branch at commit-four, and the primary co-operative'due south latest commit is at commit-3:
$ git checkout chief $ git reset --hard HEAD~i HEAD is at present at 7e7cb40 Commit three $ git merge devel Updating 7e7cb40..4848c7b Fast-frontwards README.md | 1 + 1 file inverse, 1 insertion(+) 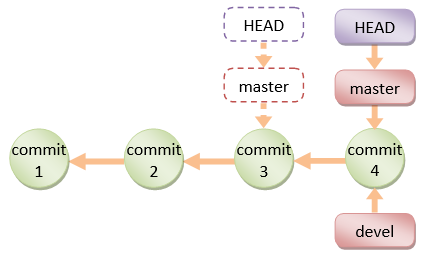
Have note that no new commit is created.
iii-Way Merge
If the two branches are diverged, git automatically searches for the common ancestor commit and performs a three-way merge. If at that place is no conflict, a new commit volition be created.
If git detects a conflict, it will pause the merge and issue a merge conflict and enquire yous to resolve the conflict manually. The file is marked every bit unmerged. You can consequence "git condition" to check the unmerged files, written report the details of the conflict, and decide which way to resolve the conflict. Once the conflict is resolve, stage the file (via "git add <file>"). Finally, run a "git commit" to finalize the 3-way merge (the same Edit/Stage/Commit cycle).
$ git checkout master $ git reset --hard Head~one Head is now at 7e7cb40 Commit iii $ git add README.md $ git commit -m "Commit 5" $ git checkout devel $ git reset --hard Caput~one $ git add README.physician $ git commit -m "Commit 4" $ git checkout master $ git merge devel Machine-merging README.md Conflict (content): Merge conflict in README.md Automatic merge failed; fix conflicts and then commit the outcome. $ git status # On branch master # You accept unmerged paths. # (prepare conflicts and run "git commit") # # Unmerged paths: # (apply "git add together <file>..." to mark resolution) # both modified: README.md no changes added to commit (utilise "git add" and/or "git commit -a")
The conflict file is marked as follows (in "git status"):
<<<<<<< HEAD This is the README. My electronic mail is abc@abc.com ======= This is the README. My email is xyz@xyz.com >>>>>>> devel This line is added after Commit 1 This line is added afterwards Commit two
You demand to manually make up one's mind which way to take, or you could discard both by setting the email to zzz@nowhere.com.
$ git add README.md $ git commit -m "Commit 6"
Take annotation that In a 3-way merge, a new commit volition be created in the process (dissimilar fast-forward merge).
Deleting a Merged Branch (git co-operative -d <branch-name>)
The merged branch (e.1000., devel) is no longer needed. Yous can delete it via "git branch -d <branch-proper noun>".
$ git branch -d devel Deleted branch devel (was a20f002). $ git branch devel
Rebasing Branch (git rebase)
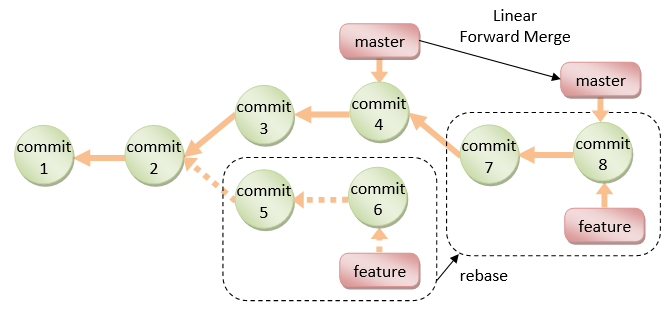
The primary purpose for rebasing is to maintain a linear project history. For example, if you checkout a devel branch and piece of work on commit-5 and commit-half-dozen, instead of doing a 3-way merge into the master branch and subsequently remove the devel branch, you lot tin can rebase the commit-5 and commit-6, on commit-4, and perform a linear forward merge to maintain all the project history. New commits (vii and eight) will be created for the rebased commit (5 and six).
The syntax is:
$ git rebase <base-name>
Examples:
$ git checkout -b feature master $ git checkout -b hotfix master $ git checkout master $ git merge hotfix $ git branch -d hotfix $ git checkout feature $ git rebase principal $ git checkout principal $ git merge feature
Meliorate the Concluding Commit (git commit --better)
If you brand a commit but want to change the commit bulletin or adding more changes, yous may amend the recent commit (instead of creating new commit) via command "git commit --amend"):
$ git commit --improve -k "message"
For example,
$ git commit -m "added login menu" $ git add morefile $ git commit --meliorate
More than on "git checkout" and Detached Head
"git checkout" can be used to checkout a branch, a commit, or files. The syntaxes are:
$ git checkout <branch-name> $ git checkout <commit-name> $ git checkout <commit-name> <filename>
When you checkout a commit, Git switches into so-called "Detached HEAD" state, i.eastward., the Head discrete from the tip of a co-operative. Suppose that you continue to work on the detached HEAD on commit-5, and wish to merge the commit-five back to master. Y'all checkout the master co-operative, but there is no branch name for your to reference the commit-5!!!
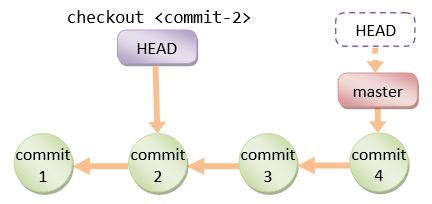
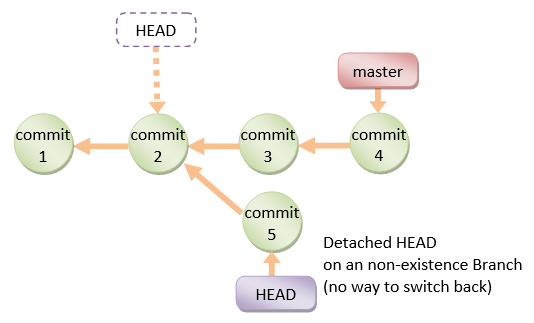
In Summary, you lot can use "git checkout <commit-name>" to inspect a commit. BUT you should e'er work on a co-operative, Not on a detached Head.
More than on "git reset" and "git reset --hard"
[TODO] examples and diagram
$ git reset <file> $ git reset $ git reset --difficult $ git reset <commit-proper name> $ git reset --hard <commit-name>
[TODO] Diagram
[TODO] --soft option
git revert <commit-proper name>
The "git revert" undoes a commit. But, instead of removing the commit from the project history, information technology undos the changes introduced by the commit and appends a new commit with the resulting content. This prevents Git from losing history. "git revert" is a safer fashion comparing with "git reset".
$ git revert <commit-name> [TODO] example and diagram
Summary of Piece of work Flows
Setting upward GIT and "Edit/Phase/Commit/Push" Cycle
Step i: Install GIT.
- For Windows and Mac, download the installer from http://git-scm.com/downloads and run the downloaded installer.
- For Ubuntu, consequence command "
sudo apt-go install git".
For Windows, employ "git-fustigate" command shell provided by Windows installer to issue command. For Mac/Ubuntu, employ "Terminal".
Step two: Configuring GIT:
$ git config --global user.electronic mail "your-email@yourmail.com" $ git config --global user.name "your-name"
Step 3: Prepare GIT repo for a project. For instance, we have a projection called "olas1.ane" located at "/usr/local/olas/olas1.1".
$ cd /usr/local/olas/olas1.i $ git init $ ls -al
Create a "README.medico" (or "README.material" if you are using Eclipse's WikiText in "textile" markup) under your projection directory to describe the projection.
Pace 4: Start "Edit/Phase/Commit/Push" cycles.
Create/Modify files. Stage files into the staging area via "git add <file>".
$ git status ...... $ git add README.md $ git add www ...... $ git condition ......
Step five: Create a ".gitignore" (in the projection base directory) to exclude folders/files from being tracked by GIT. Check your "git condition" output to decide which folders/files to be ignored.
For instance,
.* .*/ www/test/ www/.* www/.*/
The abaft slash indicate directory (and its sub-directories and files).
If you want the ".gitignore" to exist tracked (which is in the ignore list):
$ git add together -f .gitignore
Stride half dozen: Commit.
$ git status ...... $ git commit -yard "Initial Commit" ...... $ git condition ......
Step 7: Push button to the Remote Repo (for backup, version control, and collaboration).
You need to starting time create a repo (says olas) in a remote GIT host, such as GitHub or BitBucket. Accept note of the remote repo URL, e.g., https://username@hostname.org/username/olas.git.
$ cd /path-to/local-repo $ git remote add origin https:// hostname/username/olas.git $ git button origin master
Check the remote repo for the files committed.
Footstep viii: Work on the source files, brand changes, commit and push to remote repo.
$ git status ...... $ git add .... ...... $ git commit -m "commit-message" $ git button origin primary
Step 9: Create a "tag" (for version number).
$ git tag -a v1.i -thou "Version ane.ane" $ git tag ...... $ git push origin --tags
Branch and Merge Workflow
It is a expert exercise to freeze the "main" co-operative for production; and work on a development branch (says "devel") instead. Yous may often spawn a branch to ready a bug in the production.
$ git checkout -b devel $ git add <file> $ git commit -yard "commit-message" $ git checkout master $ git merge devel $ git push origin master devel $ git checkout devel $ git checkout master $ git branch -d devel $ git checkout -b devel
Viewing the Commit Graph (gitk)
You tin use the "git-gui" "gitk" tool to view the commit graph.
To run the git-gui, you tin can right-click on the project folder and choose "Git Gui"; or launch the Git-fustigate shell and run "git gui" control.
To view the commit graph, choose "Repository" ⇒ "Visualize principal's history", which launches the "gitk". You can view the details of each commit.
Collaboration
Reference: https://www.atlassian.com/git/tutorials/making-a-pull-request/how-it-works.
Synchronizing Remote and Local: Fetch/Merge, Pull and Button
Setup up a remote repo (revision)
Every bit described earlier, you can use "git remote" control to gear up upward a "remote proper name", mapped to the URL of a remote repo.
$ git remote add <remote-name> <remote-url> $ git remote add together origin https://hostname/username/projection-name.git $ git remote -v $ git remote rm <remote-proper name> $ git remote rename <old-remote-name> <new-remote-name>
Cloning a Remote Repo (revision)
$ git clone <remote-url> $ git clone <remote-url> <working-directory-name>
Whenever yous clone a remote repo using command "git clone <remote-url>", a remote name called "origin" is automatically added and mapped to <remote-url>.
[TODO] Diagram
Fetch/Merge Changes from remote (git fetch/merge)
The "git fetch" command imports commits from a remote repo to your local repo, without updating your local working tree. This gives y'all a run a risk to review changes before updating (merging into) your working tree. The fetched objects are stored in remote branches, that are differentiated from the local branches.
$ cd /path-to/working-directory $ git fetch <remote-proper noun> $ git fetch <remote-name> <co-operative-proper name> $ git branch * master devel $ git branch -r origin/master origin/devel $ git checkout master $ git merge origin/main
[TODO] Diagram
git pull
As a short manus, "git pull" combines "git fetch" and "git merge" into one command, for convenience.
$ git pull <remote-name> $ git fetch <remote-name> <current-branch-proper noun> $ git merge <remote-name> <current-branch-proper noun> $ git pull --rebase <remote-name>
The "git pull" is an easy mode to synchronize your local repo with origin'south (or upstream) changes (for a specific branch).
[TODO] Diagram
Pushing to Remote Repo (revision)
The "git push <remote-name> <co-operative-proper noun>" is the counterpart of "git fetch", which exports commits from local repo to remote repo.
$ git push <remote-name> <co-operative-name> $ git push button <remote-proper noun> --all $ git push <remote-name> --tag $ git push button -u <remote-name> <branch-proper name>
[TODO] Diagram
"Fork" and "Pull Request"
"Fork" and "Pull Asking" are features provided by GIT hosts (such as GitHub and BitBucket):
- Pushing "Fork" push to copy a projection from an account (e.thou., project maintainer) to your own personal account. [TODO] diagram
- Pushing "Pull Request" push to notify other developers (east.g., project maintainer or the entire project team) to review your changes. If accustomed, the project maintainer can pull and utilise the changes. A pull request shall provide the source's repo name, source's branch name, destination's repo name and destination'southward branch name.
Characteristic-Branch Workflow for Shared Repo
Feature-Branch workflow is more prevalent with pocket-sized teams on private projects. Everyone in the team is granted button access to a single shared remote repository and feature (or topic) branches are used to isolate changes fabricated by the team members.
The project maintainer starts the "primary" branch on the shared remote repo. All developers clone the "main" branch into their local repos. Each developer starts a feature co-operative (east.1000., "user1-featureX") to work on a characteristic. Once completed (or even piece of work-in-progress), he files a "pull request" to initiate a review for his feature. All developers tin can provide comments and suggestions. Once accepted, the projection maintainer can then merge the feature co-operative into the "master" branch.
The steps are:
- Mark, the project maintainer, starts the projection past pushing to the shared remote repo's "
main" branch. - Ballad, a contributor, clones the project into her local repo, via:
$ cd parent-directory-of-the-working-directory $ git clone https://hostname/path-to/project-name.git
- Carol starts a feature co-operative (says "
ballad-feature") under the "master" branch to work on a new characteristic, via:$ git checkout -b carol-characteristic master $ git status $ git add <file> $ git commit -m <bulletin> $ git push origin carol-feature
- Ballad completes the new characteristic. She files a "pull request" (by pushing the "pull request" button on the Git host) to notify the rest of the team members.
- Mark, the project maintainer, or anyone in the team, can comment on Carol's feature. Carol can re-work on the characteristic, if necessary, and pushes all subsequent commits under her feature branch.
- Once the feature is accustomed, Marking, or anyone in the squad (including Carol), performs a merge to apply the feature branch into the "
principal" branch:$ git checkout primary $ git pull origin master $ git pull origin carol-characteristic $ git push origin master
- Everyone can update their local repo, via:
$ git checkout master $ git pull origin master
[TODO] Diagram
Forking Workflow
In Forking workflow, Instead of using a common shared remote repo, each developer forks the projection to his own personal account on the remote host. He and then works on his feature (preferably in a feature co-operative). One time completed, he files a "pull request" to notify the maintainer to review his changes, and if accepted, merge the changes.
Forking workflow is applicable to developers working in modest teams and to a third-party programmer contributing to an open up source project.
The steps are:
- Marker, the projection maintainer, pushes the project from his local repo ("
master" branch) to a remote Git host. He permits "read" access by contributors. - Ballad, a correspondent, gotos Marking's repo, forks the project (by pushing the fork button). "Forking" copies the project to Carol's own personal account on the aforementioned Git host.
- Carol and so clones the projection from her forked repo into her local repo, via:
$ cd parent-directory-of-the-working-directory $ git clone https://hostname/carol/projection-name.git
- When a fork is cloned, Git creates a remote-proper name chosen
originthat points to the fork, non the original repo it was forked from. To continue rail of the original repo, Carol creates a remote name called "upstream" and pulls (fetches and merges) all new changes:$ cd carol-local-repo-of-the-fork $ git remote add upstream https://hostname/marking/project-proper name.git $ git remote -five $ git pull upstream primary
- Now, Carol can brand changes on her local repo (on a new branch), stage and commit the changes, and pushes them to her forked remote repo (so called Edit/Stage/Commit/Push button cycles):
$ git checkout -b carol-feature master $ git status $ git add <file> $ git commit -thousand <message> $ git push origin ballad-feature
- Ballad files a pull request to Mark (the project maintainer) past pushing the pull-request button. She needs to specify her forked remote repo-name, her branch proper noun (
carol-feature), Mark's remote repo-name, and Marking's co-operative proper name (master). - Mark opens the pull asking (in pull asking tab), reviews the change, and decides whether to take the changes. Mark tin inquire Carol to re-work on the feature. Carol repeats the Edit/Phase/Commit/Push button cycles.
If Marker decides to accept the changes, he pushes the "Merge" button to merge Carol's contribution to hischiefco-operative on the remote repo.
[If in that location is no "Merge" push button] Mark needs to exercise the following:$ git checkout chief $ git remote add together carol git://hostname/ballad/project-proper noun.git $ git pull carol carol-feature $ git push origin master
- All contributors (including Mark and Carol) shall regularly synchronize their local repo past fetch/merge with Mark's
mainbranch.$ git checkout master $ git pull upstream master
Other Workflows
There are other workflows such as "Centralized Workflow" and "GitFlow Workflow". Read "https://www.atlassian.com/git/tutorials/comparing-workflows/gitflow-workflow".
Miscellaneous and How-To
Stage and Commit (git commit -a -grand <message>)
You can skip the staging (i.due east., the "git add together <file>...") and commit all changes in the working tree via "git commit -a -k <message>" with -a (or --all) option.
Stage all changes (git add -A)
Y'all tin can employ "git add -A" to stages all changes in the working tree to the staging area.
Unstage a Staged file (git rm --cached <file> / git reset head <file>)
Recall that you can employ "git add together <file>" to stage new files or modified files into the staging area.
To unstage a staged new file, utilise "git rm --cached <file>".
To unstage a staged modified file, employ "git reset caput <file>".
Unmodified a modified file (git checkout -- <file>)
After a commit, you may have modified some files. You can discard the changes by checking out the last commit via "git checkout -- <file>".
How to Amend the Terminal Commit (git commit --improve)
If you brand a commit but desire to change the commit bulletin:
$ git commit --meliorate -thousand "message"
If yous make a commit but realize that yous have not staged some file changes, you can also do it with --amend:
$ git add morefile $ git commit --improve
You lot can also brand some changes to working tree, phase, and ameliorate the last commit
$ git add morefile $ git commit --amend
How to Undo the Previous Commit(s) (git reset)
To undo previous commit(s):
$ git reset --soft HEAD~1 $ git reset --soft Caput^ ...... $ git add together ...... $ git commit -c ORIG_HEAD
The "git reset --hard HEAD~one" moves the HEAD to the previous commit, restore the working tree and discard the index (i.due east., discard all modify after the previous commit). Instead of HEAD~n , you can also specify the commit hash code.
The "git rest HEAD~1" with default --mixed moves the HEAD to the previous commit, continue the working tree and discard the index
The "git reset --soft HEAD~i" moves the HEAD to the previous commit, keep the working tree and the index (i.e., keep all changes after the previous commit).
[TODO] Examples, diagrams and "git status" outputs.
For a public repo, you probably need to brand some other commit and push the commit to the public repo, or ...
Relative Commit Names
A commit is uniquely and admittedly named using a 160-bit (40-hex-digit) SHA-1 hash code of its contents. You can always refer to a commit via its hash value or abbreviated hash value (such as the first 7 hex-digit) if there is no ambiguity.
Yous tin can also refer to a commit relatively, e.g., master~1 (Windows), chief^ (may not piece of work in Windows), master^1 refers to the previous (parent) commit on the master co-operative; principal~2, primary^^ refers to the previous of the previous (grandparent) commit, and etc. If a commit has multiple parents (e.one thousand., due to merging of branches), ^1 refers to the first parent, ^2 refers to the 2nd parent, and and then on.
REFERENCES & Resources
- GIT mother site @ http://git-scm.com and GIT Documentation @ http://git-scm.com/doc.
- Git User'south Manual @ http://world wide web.kernel.org/pub/software/scm/git/docs/user-manual.html.
- Git Hosts: GitHub @ https://github.com, Bitbucket @ https://bitbucket.org.
- Git Tutorials @ https://world wide web.atlassian.com/git/tutorials.
- Bitbucket Documentation Abode @ https://confluence.atlassian.com/display/BITBUCKET/Bitbucket+Documentation+Home.
- Bitbucket 101 @ https://confluence.atlassian.com/display/BITBUCKET/Bitbucket+101.
- Jon Loeliger and Matthew McCullough, "Version Command with Git", 2nd Eds, O'reilly, 2012.
- Scott Chacon, "Pro Git", Apress, 2009.
Latest Version Test: git 1.9.0 (Windows), git x.x.x (Ubuntu)
Last modified: September, 2014
Source: https://www3.ntu.edu.sg/home/ehchua/programming/howto/Git_HowTo.html